Building a Simple Caching Proxy with NestJS
In today's fast-paced digital landscape, speed and efficiency are critical. Caching is one of the most effective ways to improve performance and reduce backend load by storing frequently accessed data. In this article, we'll build a simple caching proxy server using NestJS, a progressive Node.js framework. This proxy will forward requests to an origin server, cache the responses, and serve them for subsequent identical requests.
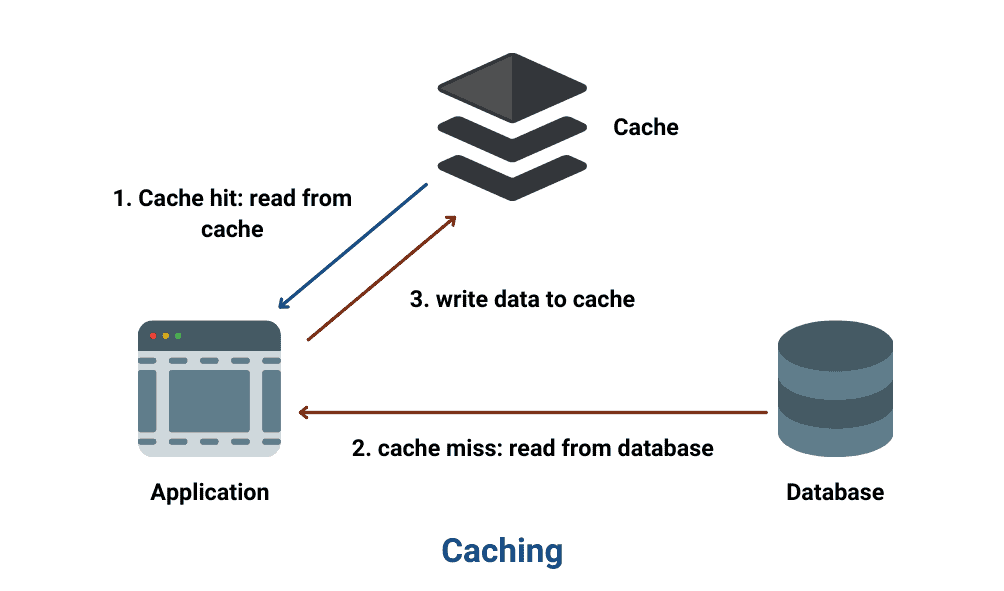
Why Build a Caching Proxy?
A caching proxy acts as an intermediary between clients (e.g., browsers, APIs) and the origin server. Its purpose is to:
- Improve performance: Serve cached responses for faster delivery.
- Reduce server load: Minimize requests to the origin server.
- Add flexibility: Intercept and modify requests/responses if needed.
By the end of this guide, you'll have a functional caching proxy server with features like cache hits, misses, and response headers.
Step 1: Project Setup
1.1 Initialize a New NestJS Project
First, create a new NestJS application:
nest new caching-proxy-cli
cd caching-proxy-cliThis scaffolds a boilerplate NestJS project with a src/ directory containing essential files.
1.2 Install Required Dependencies
We need additional libraries to handle CLI arguments and make HTTPS requests:
npm install --save yargs httpsyargs: Parses command-line arguments for starting the proxy and configuring options.https: Makes secure requests to the origin server.
Step 2: Implement the Proxy Logic
2.1 Creating the Cache and Proxy Service
The caching logic resides in the AppService. We'll:
- Cache responses in memory using a
Map. - Handle cache hits and misses.
- Forward requests to the origin server when necessary.
Create or update the src/app.service.ts file:
// src/app.service.ts
import { Injectable } from '@nestjs/common';
import * as https from 'https';
interface CacheEntry {
data: any; // Cached data
timestamp: number; // When the data was cached
}
@Injectable()
export class AppService {
private origin: string; // Origin server URL
private cache: Map<string, CacheEntry> = new Map(); // In-memory cache
// Configure the service with CLI arguments
configure(args: any) {
this.origin = args.origin;
if (args.clearCache) {
this.clearCache();
console.log('Cache cleared.');
process.exit(0); // Exit the process after clearing cache
}
}
// Handle proxy requests
proxyRequest(url: string, res: any) {
const cachedResponse = this.cache.get(url);
if (cachedResponse) {
// Cache hit
console.log('Cache HIT:', url);
res.setHeader('X-Cache', 'HIT');
res.writeHead(200);
res.end(JSON.stringify(cachedResponse.data));
} else {
// Cache miss
console.log('Cache MISS:', url);
https
.get(this.origin + url, (response) => {
let data = '';
response.on('data', (chunk) => {
data += chunk;
});
response.on('end', () => {
// Cache the response
this.cache.set(url, {
data: JSON.parse(data),
timestamp: Date.now(),
});
res.setHeader('X-Cache', 'MISS');
res.writeHead(response.statusCode, response.headers);
res.end(data);
});
})
.on('error', (err) => {
console.error('Error forwarding request:', err);
res.writeHead(500);
res.end('Error forwarding request');
});
}
}
// Clear all cache entries
clearCache() {
this.cache.clear();
}
}How It Works
- Cache Lookup: Checks if the requested URL is cached.
- Hit: Serves the cached response.
- Miss: Forwards the request to the origin server and caches the response.
- Cache Structure: Uses an in-memory
Mapto store URL-response pairs. - Cache Clearing: Provides a
clearCachemethod to remove all cached data.
2.2 Setting Up the Controller
The controller routes incoming requests to the AppService for processing.
Update or create src/app.controller.ts:
// src/app.controller.ts
import { Controller, Get, Req, Res } from '@nestjs/common';
import { AppService } from './app.service';
@Controller()
export class AppController {
constructor(private readonly appService: AppService) {}
@Get('*') // Route all GET requests
handleRequest(@Req() req: any, @Res() res: any) {
const url = req.url;
this.appService.proxyRequest(url, res);
}
}How It Works
- The
@Get('*')decorator matches all incoming GET requests. handleRequestextracts the requested URL and forwards it to theAppService.
Step 3: Configuring the Application
We use yargs to parse command-line arguments for --port, --origin, and --clear-cache.
Update src/main.ts:
// src/main.ts
import { NestFactory } from '@nestjs/core';
import { AppModule } from './app.module';
import * as yargs from 'yargs';
import { AppService } from './app.service';
async function bootstrap() {
const argv = yargs(process.argv.slice(2))
.options({
port: { type: 'number', demandOption: true, alias: 'p' },
origin: { type: 'string', demandOption: true, alias: 'o' },
'clear-cache': { type: 'boolean', demandOption: false, alias: 'c' },
})
.parseSync();
const app = await NestFactory.create(AppModule);
// Pass CLI arguments to the AppService
app.get(AppService).configure(argv);
await app.listen(argv.port);
console.log(
`Caching proxy server listening on port ${argv.port}, origin: ${argv.origin}`,
);
}
bootstrap();How It Works
yargsparses arguments like:--port(required): Port to run the proxy server.--origin(required): The target origin server URL.--clear-cache(optional): Clears the cache and exits.
- The parsed arguments are passed to
AppService.
Step 4: Running the Proxy
4.1 Start the Proxy Server
Run the server with:
npm run start -- --port 3000 --origin https://dummyjson.com- Replace
3000with your desired port. - Replace
https://dummyjson.comwith the origin server you want to proxy.
4.2 Test the Proxy
Use curl or a browser to test caching behavior:
-
First Request (Cache Miss):
curl http://localhost:3000/products- Response header:
X-Cache: MISS - Logs indicate the request was forwarded to the origin server.
- Response header:
-
Second Request (Cache Hit):
curl http://localhost:3000/products- Response header:
X-Cache: HIT - Logs indicate the request was served from the cache.
- Response header:
-
Clear the Cache:
npm run start -- --clear-cache- Clears all cached data and exits.
Conclusion
Congratulations! You've built a basic caching proxy server with:
- In-memory caching.
- CLI configurability with
yargs. - Headers indicating cache status (
HITorMISS).
This is just the beginning. You can extend this proxy by:
- Implementing cache expiration policies.
- Supporting POST requests and request body caching.
- Adding persistent storage (e.g., Redis).
Happy coding! 🚀